 Worsted weight yarn with the pullover pattern from Knitting Pure & Simple.
Sunday, February 7, 2010
Raglan Sweater

I feel like I've been out of the loop since the holidays, missing a lot of activity on this KAL! I have finished this sweater, which will go in the mail next week. It is a crocheted top-down raglan of my own design. I'll be writing up the pattern on my blog if anyone is interested in it.
Update: pattern is posted here.
I have yarn leftover, and I might make a quick vest version.
Saturday, February 6, 2010
My first sock, thanks for the tutorial!

Hi, I'm Sandy, and I've been knitting/crocheting for afghans for Afghans since 2006. Here's the first sock I've done, based on the this week's tutorial.
I've knit a few socks, but not in worsted wool, so thanks for the tutorial! I'm also appreciative that you "tricked" us into making larger socks-- I like making bigger kids' clothes to send to Afghanistan. It's more disappointing to have a gift that's too small than one that's too big!
This was really fast, folks: I started the day after the tutorial did, so you can definitely get a pair done in time for the Yarnmarket deadline, and certainly before the March 1 deadline!
Design notes: Used the cast-on 40 size, foot size is roughly 7 inches.
Koolaid dyed Patons for the orange, some odd wool for the gold. I fancied it up a bit with a k3 p1 rib down the instep (not too uncomfy) and heelstitch on the heel and toe for extra durability.
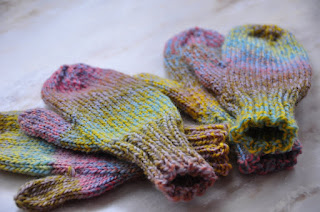
My Mittens
Just finished these two pairs of mittens and thought you all might want to see them. Hopefully, I'll get them in the mail next week for the drawing on the 12th (my dad's birthday). Depends on how long it takes to dig out our driveway!


Elizabeth and I are blogging about our year of knitting a pair of socks-a-month, you might enjoy reading our musings...check us out at Two Left Feet.
sock class, part 3: foot and toe
No pictures today -- I take all my pictures outside, and right now we're just finishing up getting 24 inches of snow. For this area -- near Philadelphia -- that is a BIG snow. I will go back in and insert pictures as soon as I get a chance, but I thought some of you might be stuck in limbo waiting for this last step.
Note: a friend is proof-knitting this lesson for me. I think it's OK, so I'm posting it now because it's Saturday and you may need it. (It's 1:45 p.m. Eastern time.) Any needed corrections will go up as soon as I receive them.
You will have noticed by now - especially if you're using the thicker yarn -- that I've tricked you into making larger-sized socks. I always feel bad for the older kids, because more of the "cuter" sizes come in. So I've deliberately aimed for medium adult sizes here.
The foot
The finished foot length of your sock should be 8 to 9.5 inches (20 to 24 cm). Once you've finished your gusset decreases and are back to a total of 36(40) stitches, continue knitting round and round until you're 1 to 1.5 inches short of your desired finished length. To measure, fold your sock flat and measure from the back of the heel. Now it's time to start the toe decreases.
The toe
Divide your stitches, if they aren't already arranged this way, as follows, starting at the center back of the heel: 9(10) on first needle; 18(20) on instep needle; 9(10) on last needle. You will be decreasing in 4 places on each decrease round. I am writing these instructions in excruciating detail; it's not that hard. Like the heel turn, it just requires a whole lot of words.
round 1: on first needle, knit 6(7) sts, k2 tog, k 1. On instep needle, k 1, ssk (as defined in the heel turn - remember? slip one stitch to righthand needle as if to knit, slip another stitch to righthand needle as if to knit, insert tip of left needle through the front of those 2 stitches and knit them together), knit 12(14) stitches, k2 tog, k1. On last needle, k1, ssk, knit to end. You should have a total of 32(26) stitches.
round 2: knit around
round 3: on first needle, k 5(6) sts, k2 tog, k1. On instep needle, k1, ssk, k 10(12), k2 tog, k1. On last needle, k1, ssk, knit to end. 28(32) stitches total.
round 4: knit around
round 5: on first needle, k 4(5) sts, k2 tog, k1. On instep needle, k1, ssk, k 8(10), k2 tog, k1. On last needle, k1, ssk, knit to end of needle. 24(28) sts.
round 6: knit around
Now you will decrease on every round. Have you figured out the pattern yet?
round 7: on first needle, knit to last 3 sts, k2 tog, k1. On instep needle, k1, ssk, knit to last 3 instep stitches, k2 tog, k1. On last needle, k1, ssk, knit to end. 20(24) sts.
round 8: work as round 6. 16(20 sts).
If you're knitting a 36-stitch sock, wait a minute for the 40-stitchers to catch up. 40-stitchers, knit one more round. 16 stitches.
Grafting the toe
Now everyone has a total of 16 stitches left, and you've ended at the middle of the heel. Take that first heel needle, and knit the 4 stitches from the other heel needle onto it. You now have all your stitches on two needles, each of which holds 8 stitches, and your working yarn is coming from the last of the heel stitches, at your right.
Now you will graft the toe. This is not hard!! Again, it just requires way too many words. If you need pictures, not my words, to figure this out, just do a google search for grafting sock toe or Kitchener stitch. There are, as always, YouTube videos.
Cut or break your working yarn, leaving about 12 inches (more than you need, but why run the risk of running out at this point?). Thread it onto a sewing-up needle. You are essentially going to lace together the front and back rows of stitches, forming a row of knitted-appearing stitches. (This is so cool.)
I will use the word "front" for the instep needle and "back" for the heel needle. Those needles stay in those positions until we're done.
First, to start off, take that sewing-up needle, and thread it through the first stitch on the front needle as if to purl -- that means from right to left. Do NOT remove that stitch from the needle. Pull the yarn all the way through. Next, move the yarn to the back and put your sewing up needle through the first stitch on the back needle as if to knit, and pull the yarn through. Do NOT remove that stitch from the needle. This gives you a nice beginning to this edge of the toe.
Now we're going to start grafting. I will use the term "sewing-up needle," even though it's cumbersome, to indicate the one with the eye and the yarn threaded through it. If I just say "needle," it means the double-pointed needle that is holding the stitches.
step 1: Thread the sewing-up needle through the first stitch on the front needle as if to knit and take it off the needle. Thread the sewing-up needle through the next stitch on the front needle as if to purl; pull yarn through and leave that stitch on the needle.
step 2: Move yarn from front to back. Now, put the sewing-up needle through the first stitch on the back needle as if to purl, pull yarn through, and remove that stitch from the needle. Put sewing-up needle through next stitch on back needle as if to knit; pull yarn through and leave that stitch on the needle. Move yarn back to front, and repeat steps 1 and 2 until you've used up all the stitches.
It's an easy rhythm: one off, one on, switch needles. One off, one on, switch needles. Just pay attention to which way you're putting the sewing-up needle through the stitches. "As if to knit" means left to right; "as if to purl" means right to left. You should get a magical row of little V's, like stockinette stitch. If you get little U's, like garter stitch, you're putting your sewing-up needle in backward.
Last stitch -- thread yarn through and snug it up. This always gives me a nasty little point, sometimes called an "ear." I don't know if this is technically proper, but here's how I make it go away. With sewing-up needle, move one stitch away from the toe, into the sock, pull the yarn all the way through, and give it a little tug. It should disappear. You might have a tiny little bump left, but it smooths right out.
Now -- make another sock to match!
For part 1 of this sock class, go here.
For part 2, go here.
For part 4, go here.
Friday, February 5, 2010
Steppe vest


Just finished this Steppe vest in double-stranded Danskyarn. I've had the dark gray for a long time (I used them for a4a mittens last month) and found this bright red in a ravelry stash.
Ready to go
 Hello: Here are three things I am getting ready to send to a4A...my first (and second!) pair of mittens from some very cool washable wool. I am finding great charm in doing mittens and have started a third pair, but I want to get these to you guys asap. (I haven't yet mailed them because I haven't managed to get to the post office yet...but I will! I hope, tomorrow!)
I am a new poster...so I am told that I should introduce myself! I started knitting right after 9/11 and find it soothing in the face of my very stressful life and job. I love producing something. I love knitting for a4A because there is purpose to my production. I don't do anything fancy, but they are good, servicable things that I hope will bring pleasure to an older boy or girl...I say that because I wonder if a4A tends to get lots of little people things.
The spirit and joy of a4A also charms me...I love who you all (and now, I hope, me) seem to be. I look forward to following your journey.
Thursday, February 4, 2010
Vests and socks ready to send
 Here's my version of the InVest for Peace, made into a V-neck pullover rather than a cardigan, and a nice big pair of socks. Elizabeth, do you recognize your yarn? Thanks so much. I have only a little left, which I'll use in the next blanket/afghan campaign.
Wednesday, February 3, 2010
sock class, part 2: dividing stitches and working the heel flap
So you've finished the leg of your sock. Now it's time to work the heel flap. First, divide the stitches in half.

You'll put one half on a stitch holder and work the heel on the other half. Divide the stitches so the working yarn is coming out of the last stitch of the group you are going to put on the holder, ready to work the first heel stitch. Some people use a knitting needle as their holder; others use those holders that look like a giant safety pin. However, because those are straight and not flexible, and actually do weigh a little bit, they have a tendency to stretch out your corner stitches, leaving unsightly holes later on. So -- use a length of contrasting yarn. Thread it through your 18 (20) instep stitches, and remove those from the needle. You now have half your stitches on a strand of yarn, and the other half on a single needle. The working yarn is ready and waiting.
(Be careful, on the first stitch of the heel flap, not to pull the yarn so tight that you close up the last stitch on your holder -- you will regret it later).
Heel flap
For the heel flap, you knit back and forth, as follows:
row 1: slip 1, knit 1, slip 1, knit 1, continuing in this pattern all the way across and ending knit 1. (If you did not end with a knit stitch, you goofed -- undo and fix it.)
row 2: slip first stitch as if to purl, purl the whole row until just 1 stitch is left, move yarn to back, knit last stitch.
Repeat those two rows until you have worked 17(19) rows. You will end having just worked a knit row.

Turn heel
This part is just plain magic! It's not complicated, but it's hard to describe without a lot of words. If you haven't done this before, don't think too hard -- just follow the directions step by step.
Row 1: slip first stitch as if to purl, purl 10(11), purl 2 together, purl 1. Now turn your work -- yes, it's true, you have not finished the row. This is called a short row, and it's a way to build curves into your knitting.
Row 2: slip first stitch as if to knit, knit 5, knit 2 together, knit 1. Turn your work.
Row 3 (and all subsequent purl-side rows): slip first stitch as if to purl, purl across until there is 1 stitch left before the gap that was formed when you turned the work before. Purl that stitch together with the stitch on the other side of the gap, purl 1. Turn your work.
Row 4 (and all subsequent knit-side rows): slip first stitch as if to knit, knit over until you are 1 stitch before the gap formed when you turned the work before. Knit that stitch together with the stitch on the other side of the gap, knit 1. Turn work.
Continue working according to this pattern until you have used up all the stitches. You should finish at the end of a knit row, with 10(12) stitches on your needle. If you have extra stitches, or don't end at the end of a knit row, something has gone wrong and -- I regret to inform you -- you have to rip out and work back.
You have formed a nifty little pocket, just right to cradle the bottom of the heel.


Now you have to get all the other stitches back on the needles and knit the gusset, a triangular section that accommodates the ankle.
Pick up stitches for gusset
Take one of your empty needles and, starting on the side of the heel flap where your working yarn is waiting, pick up stitches along one side of the heel flap. You will see a convenient line of V-shaped stitches along the side of the flap (my apologies -- the yarn I'm using for this sock is fuzzier than I realized, and not ideal for this illustration).

I prefer to pick up the stitches by sliding my new needle under both legs of that V, then "knitting" through it with the working yarn. Pick up a new stitch for each V along that side edge, all the way to the end of the flap.
Now it's time to put your 18(20) instep stitches back on a needle. Slide the needle back in along the path marked by your holder yarn. I leave that yarn in place -- it makes an easy marker to count from to match the second sock to the first, or if it's necessary to rip back. You may prefer to remove it. Either way is OK. Knit across those 18(20) instep stitches.
Now it's time to pick up stitches along the second side of the heel flap. Follow the same technique you used on the first side, making sure you have the same number of stitches here as on the first side. (Sometimes you have to "invent" one to make this happen.)
Form gusset
Now all 4 of your needles are full of stitches. What to do? With the needle that just finished picking up your heel flap stitches, knit 5(6) stitches from the next needle. Slide the other 5(6) stitches onto the next needle. You are now at the exact center of the back of the heel. You have 18(20) stitches on your instep needle, and 15(16) stitches on each of the side needles. (Sometimes I get an extra stitch, for 17 -- as long as both sides are the same, that's fine.)
(People sometimes like to continue the ribbing down the foot; for thick socks like these, I think it's more comfortable to do the foot in plain stockinette, so that's how these directions continue.)
Work one round plain.
Now you will gradually decrease the number of stitches on those side needles, until you're back to 9(10) on each. The 18(20) stitches on the instep needle remain constant. Work as follows:
Decrease round: on needle 1 (that's the one that goes from the center heel up to the instep needle) knit until you have 3 stitches left, k2 together, k1. Knit across the 18(20) instep stitches. On needle 3 (that's the one that goes from the instep needle back to the center of the heel) k1, ssk [slip 1 as if to knit, slip 1 as if to knit, insert lefthand needle from left to right through front of those 2 stitches and knit them together), knit to end of needle.
Work 1 round plain.
Repeat these two rounds until each of the side needles has 9(10) stitches.
Next installment: the foot
Tuesday, February 2, 2010
I've been nudged!

I just packed up five pairs of mittens: 2 large, 2 medium and 1 small. I hope I can get some more done later, but these are on their way!
Monday, February 1, 2010
sock class, part 1: cast on and knit the cuff
These socks will be worked starting at the cuff and working toward the toe. If you're using a "standard" smooth worsted (Cascade 220, Paton's Classic Merino, Plymouth Galway, or a yarn like that), please follow the directions for the 40-stitch sock. If you're using a thicker worsted, such as Bartlett's Maine wool or Peace Fleece, either of the sizes will be useful for this campaign.
I've chosen to work with my favorite, Bartlett's Maine wool.
 Although I always use metal needles when I use skinny "sock" yarn, I love to use bamboo with worsted. I'll be casting on and working the cuff in stripes, with the rest of the sock in a different color. You can use stripes, or a broad band of a contrast color, or just do the whole sock in a single color, as you wish. I think I will use the grayish color as my main color, with a stripe each of red, green, and purple at the top.
To begin, you will need a good stretchy cast-on. Long-tail is fine -- when you cast on, leave a wide space between each stitch and the one before it, to ensure adequate stretch. Twisted German cast-on is even stretchier. I often cast on using long-tail in a knit and purl pattern that matches my initial ribbing. Remember -- this part of the sock has to go over the whole ankle; make it stretchy so it's easy to get on and the stitches don't pop. You can find good YouTube videos and written descriptions by using google to search for long-tail cast-on, twisted German cast-on, or purl long-tail cast-on.
Now, more decisions! What ribbing do you want to use? Do you want to use that ribbing for the whole leg? Do you want to use that ribbing for 2 inches and then switch to stockinette? Do you want to start with k1 p1 and then switch to k3 p1 after 8 rows, or 2 inches, or after you've finished your band of contrast color? For this sock, I think I will do the entire cuff in k2 p2 ribbing, including the stripes at the top. My plan is to work 5 rounds in each color, then change to the main color. This, of course, may change. Stripes are fun, make an otherwise unexciting sock a little more interesting, and also allow you to stretch your main color if you're having an episode of yarn insecurity. (Not an issue this time, as I am starting with 4 full skeins, but I have found myself in that situation many times.)
When I make socks, I use 3 needles to hold the stitches and a fourth to work them. Feel free to use a set of 5, two circulars, one long circular, or whatever else may work for you. It's not hard to make the instructions work for a different technique; you're just knitting in a circle, after all.
Have you chosen your needle size? I am a very loose knitter -- unless you are, too, please do not follow blindly but do a little research and choose the needle size that's right for you. For the Maine wool I'm using here, I use a size 7 needle (4.5 mm) when making a sweater or a blanket, to get 4 stitches per inch (16 sts/10 cm). For socks, I use size 5 neeedles (3.75 mm) to get 5 stitches per inch (20 sts/10 cm). It's very, very important to knit socks more tightly than you're used to, or they will develop holes very quickly. If you're using Maine wool or a similar yarn, aim for 5 stitches per inch; if you're using a smoother worsted (such as Cascade 220), aim for 5.5 or even 6.
Cast on 36 (40) stitches. Use a single needle for your cast-on stitches; then divide the stitches among the three working needles. I like to arrange the stitches so that each needle ends with the last stitch in the ribbing pattern. So if, for instance, I will ultimately be using k3 p1 ribbing (a multiple of 4) or k2 p2 ribbing (also a multiple of 4) and I'm making a 40-stitch sock, I'd arrange the stitches over three needles: 12/12/16.
It's important to join the stitches so they are not twisted. If you're worried about that, if you always twist the stitches no matter how hard you try, or if you have trouble with floppy needles before you've knit a few rows, here's an alternative: work the first 3 rows back and forth and then join and knit in the round. You'll have a 3-row seam to sew up at the end, which you can do as part of weaving in the ends.
Work cuff

(The astute reader will say, "Wait a minute! That yarn is blue!" Yes, I serendipitously stumbled across a ball of blue, already wound, and wanted to knit fast so I could give you another photo. I'm easily swayed that way.)
I knit the first two stitches of the first round using both the working yarn and the cast-on tail, to strengthen this potential weak spot.
Work in ribbing of your choice:
for 2 inches, if you plan to continue in stockinette, or
for 8 rows, if you plan to change to k3 p1, or
for 6 (7) inches if you have decided to use the same ribbing from the beginning all the way to the foot
Work until the cuff measures 6 (7) inches. Be aware that for the first several rows, your sock will look much too big. Then the ribbing takes effect and pulls it in nicely -- do not panic and rip out!
next installment: dividing stitches and working the heel flap
Hello New Friends
Hi everybody, time for me to come out of lurkdom. In Minnie Pearl's inimitable words "I'm so proud to be hyear!" I've knit intermittently most of my life, pretty steadily for the last seven years. My grandmother taught me when I was five so she could visit undistrubed with her sisters and it worked beautifully - I was fascinated by the process and the pale green needles and wine yarn. In a few years I'll retire from my secretarial job in an art museum and have lots of time for knitting, painting, reading and my cat, Sweetie Pie Guy. I live in Northern Virginia and am the happy recipient of Tory's gift yarn which, after a few false starts, is becoming a top down raglan. In two weeks I'm starting a group to knit for Afghans for Afghans and some will be brand new knitters. Some ideas for their projects are bubbling in my brain and I'd appreciate your suggestions.
Subscribe to:
Posts (Atom)
